
The CASTUS User Interface (UI) can be accessed by your local computer on the same network or via public IP if your IT department has this set up. This makes uploading from your computer quick and easy.
Uploading in the CASTUS UI
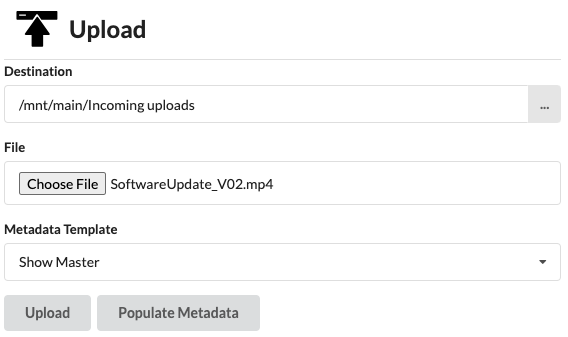
- Navigate to CASTUS > Upload.
- Uploads default to the Incoming uploads folder. To change the folder, choose the ellipses to the right of the Destination and navigate to the desired folder.
- Under File, select Choose File to browse the files on your computer.
- Select a file and choose Open.
- To utilize a Metadata Template, select a template from the dropdown.
- Choose Populate Metadata and fill in appropriate fields.
- Choose Upload.
Monitor your uploads in the File Transfer Window to the right of the upload tool.
One file may be uploaded at a time using this method, but you do not need to wait for the previous upload to finish before selecting another file to upload.
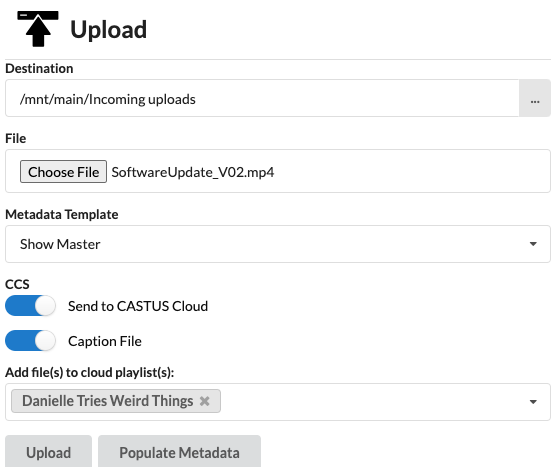
Send to VOD, Caption on VOD, and Add to Playlist
In software versions 5.8.1 and later, an additional set of options is available for CASTUS Video on Demand and file-based captioning users.
Send to CASTUS Cloud - Select this option before uploading your file if you'd also like to send the video to Video on Demand at the same time.
Caption File - File-based captioning customers can choose to automatically caption a file once sent to VOD by turning on Caption File.
Add file(s) to cloud playlist(s) - Automatically add your uploaded video to a playlist by selecting the playlist(s) from the dropdown before sending to VOD.
Are you looking for...
Uploading Files in Bulk via FTP
Bulk Upload Files via Flash Drive or Hard Drive