
To record to a USB drive, the drive must be formatted FAT32 which has a max file size of 4GB (4000MB). If your recording exceeds this size, it will be split into multiple files. If you run out of space on your drive, your recording and stream will be stopped.
DO NOT PRESS AND HOLD THE ACTION BUTTON. THIS WILL RESET YOUR VIVA TO FACTORY SETTINGS.
FINDING THE VIVA'S IP ADDRESS
Your VIVA Encoder will have a unique IP address on your network. To discover this IP address, we recommend using an IP finding service, such as Fing, to identify the IP address assigned. This is done locally on your network and CASTUS does not have access to this information. Below are directions via Fing, but other IP finders will work as well.
- On a computer that is on the same network as the VIVA Encoder, navigate to https://app.fing.com/.
- Log in or create an account.
- Browse devices and IP addresses listed to identify your VIVA Encoder.
NOTE: If you want to try out an IP address to see if it is the VIVA, paste the IP address into your browser window and hit enter. The login page for the VIVA should look like the screenshot below:

RECORDING TO A USB DRIVE
To record to a USB drive on the VIVA Encoder, you will need access to the user interface (UI) of the VIVA. Please see above for Finding the VIVA’s IP Address, have access to the network your VIVA is connected to, and a computer’s internet browser where you can enter the IP address to access advanced VIVA features.
NOTE: Only FAT32 formatted USB drives are accepted. Anything else will NOT be detected.
- Insert a USB drive into the slot on the back of the unit.
- An icon will show upon the home screen of the VIVA Encoder UI indicating that a USB drive has been detected.
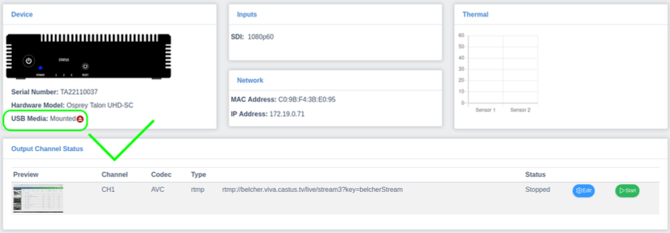
- Once your USB drive has successfully mounted on the device, navigate to Channel 1 located in the menu on the left under the Channels tab.
- Make the following changes on the Output section of the page:
- Set Aux File to MP4 File.
- Make sure that Device Type is set to USB.
- Devine your path and filename.
- Set the Max File Size in MB (recommended 4000MB).
- Recording will commence automatically when you begin live streaming and end automatically when you stop live streaming.
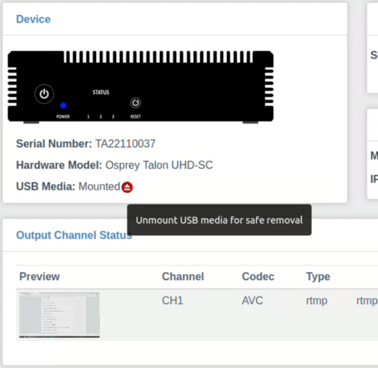
- Wait until the stream has fully stopped (stream light indicator turns off on the front of the unit) and unmount the drive from your VIVA Encoder device by using the homepage of the VIVA UI and pressing the red circle with the up arrow and line.
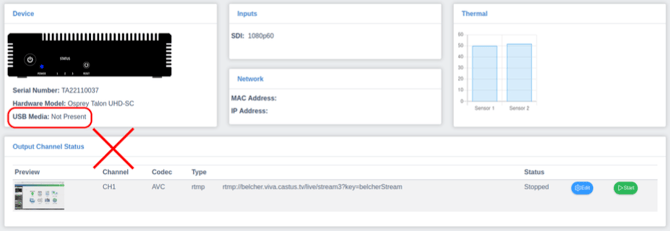
- Once you’ve unmounted the drive, the text should say Not Present indicating that the USB drive has been safely unmounted. You may now remove the drive from the VIVA unit.
- Next, using a laptop or desktop computer, plug in the USB drive to view and manage your recorded stream.
- If this is the first time recording to the USB drive, you’ll notice a text file named poke. This is normal and is simply a test file from the encoder to indicate that it successfully connected.
- You should also see the recorded MP4 file on the device with the name you entered. The format of the file name will be as follows:
ch1_{user_provided_filename}_{year}{date}-{time}_{indexnumber}.mp4