
BASIC SETUP FOR QUICKROLL & QUICKCAST UNITS
Needed to access to the server within the Local Area Network (LAN)
- Static local IP address
- Open LOCAL ports
- 22 (SSH and SFTP)
- 20 and 21 (FTP)
- 80 (HTTP)
- 443 (HTTPS)
Outgoing access to the internet for installation and ongoing support
- Gateway and DNS need to be working (test by doing a web search)
- Tech support connection via outgoing TCP port 52222, firewall enable port out
EXTERNAL ACCESS FOR SERVER (OPTIONAL)
Public IP Address
Forward Public Static IP TCP port 443 to the QuickRoll/QuickCast/Mini IP address at the same port number (443).-
- If external port 443 is in use, you can forward another port to port 443 of the CASTUS.
- Port 8443 is a common alternate port but others can be used if they won’t conflict with existing ports.
WHITELISTING (OPTIONAL)
- CASTUS Office HQ - firewall.castus.tv
- CASTUS Cloud Services (CCS)- cloud.castus.tv
- QuickStream (Legacy VOD) - YOUR_VOD_NAME.vod.castus.tv or ping the address to get specific IP
- We use Amazon CloudFront, a global content delivery network, to serve our video streams and related assets. This means your systems will see traffic coming from Amazon CloudFront edge locations, which may differ from our AWS origin IPs. If your network uses strict firewall or filtering policies, please ensure that Amazon CloudFront’s IP ranges are allowed. You can find the official list of CloudFront IP ranges at:
- https://ip-ranges.amazonaws.com/ip-ranges.json
- (filter on service = CLOUDFRONT)
RECOMMENDED NETWORK SETTINGS ON CASTUS SERVER
Use DHCP - If you are using a static IP address, it is highly recommended to set this option to no. However, if your IT department advises the use of DHCP and can allocate a stable IP address for this device, you may follow their guidance. Without a static IP address, your unit will automatically assign a different local IP address each time it restarts.
Use DHCP gateway address - If your IT department wants to assign their own gateway (recommended), change this to no. If you want to have your network determine the best gateway, leave this at yes.
Static IP address - Configuring a local static IP address is highly advisable, as it ensures that your system retains the same local IP address even after rebooting, thereby enhancing network stability. Please reach out to your IT department to obtain this information.
Static IP address netmask - It is essential to use a valid netmask address for proper network functionality. If you do not have one provided by IT, a default netmask of 255.255.255.0 is advised.
Static IP gateway - It is essential to use a valid gateway address for proper network functionality. Please reach out to your IT department to obtain this information.
Static IP DNS Server(s) - It is essential to use a valid DNS server for proper network functionality. Please reach out to your IT department to obtain this information. If you are having trouble with the provided DNS server, you can use Google's server of 8.8.8.8 for testing purposes. It is not advisable to use this long-term for security reasons. You may input a maximum of two IP addresses, separated by a space.
NOTE: The static IP address assigned to the server is a LOCAL static IP, meaning it is only accessible within your local network. To access your CASTUS from an external network, you will need a static PUBLIC IP address. This public address is obtained from your internet service provider and must be configured correctly by your IT department. CASTUS is not responsible for public IP addresses or their configuration.
CHANGING NETWORKING SETTINGS ON CASTUS SERVER
- Access the physical CASTUS unit or SSH into the machine on the local network
ssh root@LOCAL_IP_ADDRESS - If you are at the initial power up screen (all black with white text), type startx and press ENTER to bring up the windowing environment.
- Click on the CASTUS Start Menu icon in the bottom left corner of the screen.
- Choose Terminal Emulator from the menu.
- In the terminal window, type net-ui and press ENTER to see editing options as well as the status of the two ethernet ports at the bottom.
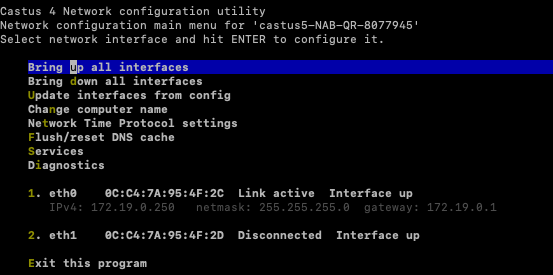
- To view/edit a port, use your arrow keys to highlight the desired port and press ENTER.
- Use your arrow keys to select edit configuration and press ENTER to change settings.
- To make changes, you use your arrow keys to select the item of interest and press ENTER.
- When you are done editing, use your arrow keys to select save changes and press ENTER.
- Then select update interface from config to make the changes active.
- Use your arrow keys to select main menu and press ENTER.
- Use your arrow keys to select exit and press ENTER to leave the program.
- When finished, leave the terminal by typing exit and pressing ENTER.
NOTE: If you are using more than one Ethernet port, then there should only be one gateway.