Covered in this Article:
Scheduling Tools in the Toolbar
Scheduling Tools in the Action Dropdown
Are you looking for...
Creating a Copy of the Schedule File
Creating a New Schedule
- Log into your CASTUS user interface (UI).
- Choose CASTUS in the top right corner and select Schedule.
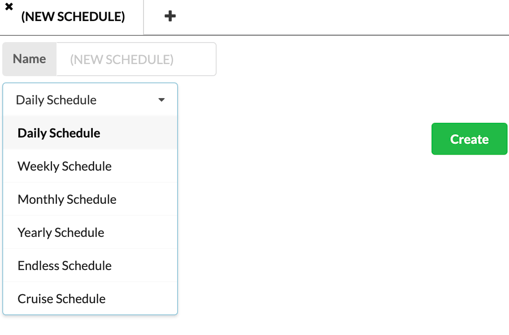
- Select the plus icon to create a new schedule.
- Name your schedule and select the schedule type from the dropdown before choosing Create.
NOTE: By default, schedule files are saved in the designated Schedules folder.
Setting a Schedule Default
Establishing a schedule default is essential to ensure that your channel remains continuously on-air. The schedule default fills the gaps between programs whenever the schedule editor displays an empty time slot.
There are two defaults, the schedule default (weekly, monthly, yearly, endless, or cruise) and the daily default. The daily default will override the schedule default for that day only.
- Open your schedule file by one of the following ways:
- If you have it already assigned to your channel, click once on the confidence monitor and then select CASTUS > Schedule or use the Schedule shortcut pinned on the task bar.
- If you have it already assigned to your channel, click on the schedule name under the confidence monitor.
- Navigate to the schedules folder in the Library and double click on the schedule file you want to edit.
- From the Library widget on the right within the Schedule Editor, navigate to a media item you wish to set as your default.
- Select the item in the Library widget by clicking it once.
- Set the item as your default by:
- Clicking in the space below your schedule default where it says (none).
- Choosing the dropdown to the right of your schedule default and selecting Set Default.
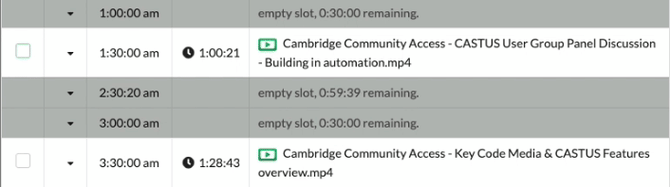
Scheduling Content
- Open your schedule file.
- From the Library widget on the right within the Schedule Editor, navigate to a media item you wish to schedule.
- Select the item in the Library widget by clicking it once.
- Click on an empty time slot to stick the item to that time slot. We call this Click & Stick Scheduling.
- While the item is still selected, you can continue to stick it to any number of time slots on any day.
- Click on another item in the Library widget to change the selected item.
NOTE: The Click & Stick feature automatically determines the next available time slot based on the duration of the scheduled item(s).
NOTE: You have the option to select several items from your library for Click & Stick scheduling. The sequence in which you choose these items will determine the order in which they are placed into your time slots.
Scheduling Tools in the Toolbar
![]()
Select: This feature allows you to select all items in your schedule at once, making it easier to perform bulk actions such as copying or deleting multiple entries simultaneously.
Undo/Redo/Revert: Use the Undo feature to reverse your most recent action, or select Redo to reinstate it. You can also revert your schedule back to its original state as it was when you first opened it.
Add: To add an item more efficiently, click on the desired item in the Library widget and then select Add from the toolbar. This allows you to add the item across multiple days and time slots in a single operation, saving you time.
Clear: This function enables you to quickly remove all missing files, clear an entire day's schedule, or wipe the whole schedule with a single click, streamlining your workflow.
Replicate Day: This feature lets you duplicate the entire schedule of one day to another, including all blocks and their contents. Once copied, the schedules are independent, allowing you to make edits without affecting the original.
Scroll To: Use this tool to quickly navigate to a specific time in your schedule, which is particularly helpful when managing numerous short programs throughout the day.
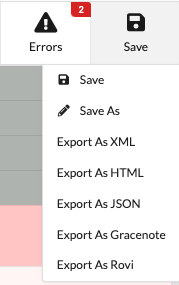
Errors: Errors arise when multiple programs are scheduled to play simultaneously or overlap. Click the errors button to jump to the first detected error in your schedule, allowing you to address it promptly. You can continue pressing the button to cycle through all identified errors.
Save: Ensure your work is not lost by saving your schedule regularly. You can also use the "Save As" option to create a duplicate of your schedule. Additionally, export your schedule in various file formats such as XML, HTML, or JSON. For EPG providers like Gracenote or Rovi, you can also export a CSV file.
Scheduling Widget Windows
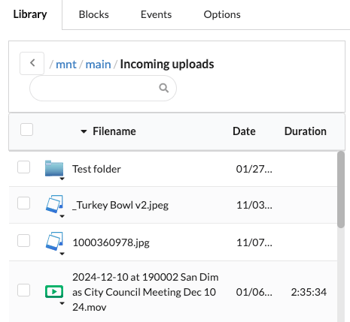
Library: The Library widget serves as your primary resource for locating and accessing content. You can easily navigate through or search for media items here, allowing you to utilize the Click & Stick feature to schedule content at specified times within your calendar.
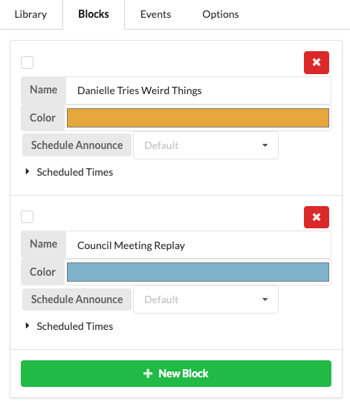
Blocks: Blocks provide a streamlined method for scheduling recurring content, such as replays or related programs. You can effortlessly duplicate these blocks across your schedule, significantly reducing the time spent on scheduling tasks. Learn more about blocks in the article Block Scheduling.
Events: Historically, events were utilized for scheduling before the introduction of blocks and are now being phased out in favor of the more efficient block programming. The option remains for legacy users of Events.
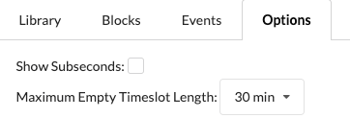
Options: Within the options widget, you have the flexibility to add subseconds to your scheduling or adjust the interval of your schedule to 1 hour, 30 minutes, or 15 minutes, with the default setting established at 30 minutes.
Scheduling Tools in the Action Dropdown
After adding an item to your schedule, you can access a range of options through the action dropdown menu.
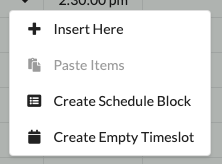
Insert Here: This feature provides an alternative method for adding content to your schedule. To use it, first select the desired item from the Library widget. Then, choose the "Insert Here" option to position the item at the specified time. Additionally, you can click on an empty slot and the time remaining to seamlessly add it to your schedule. Also available on the action dropdown of an empty slot.
Remove Items: This function offers a quick way to delete an item from your schedule.
Replacing Item: This option allows you to substitute the currently scheduled item with the one you have selected in the Library widget.
Replace All Instances: With this feature, you can replace every occurrence of a scheduled item throughout your entire schedule with a new item, ensuring consistency across your programming.
Cut: Use this option to remove an item from your schedule while copying it to your clipboard, allowing you to paste it into a different time slot as needed.
Move to Timeslot: This feature allows you to swiftly relocate an item to a different timeslot within your schedule. Upon selection, a dialog box will prompt you to specify the new timeslot for the item.

Replicate to Times: With this option, you can easily duplicate an item across multiple times throughout your schedule. This serves as an alternative method for adding specific times without relying solely on blocks.

Push Item Backwards/Forwards: This function enables you to adjust an item's placement by moving it either backwards or forwards to a designated time. It’s particularly useful for scheduling content at a time that has not yet been identified in your existing schedule.

Close Schedule Gap: Use this tool to eliminate any gaps within your schedule. Selecting this option will shift the remaining items either forwards or backwards, depending on your choice. If you select the item preceding the gap, the subsequent items will be moved back. Conversely, if you choose the item following the gap, the preceding items will be pushed forward.
Edit Label: Labels provide an alternative way to identify an item within your schedule that may differ from its filename. This feature is particularly useful for distinguishing episodes of a program or for displaying the full program name. Labels are not visible to the public and are intended solely for internal scheduling use.
![]()
Lock Items: Locking an item ensures that it remains fixed in place and cannot be edited. This functionality is beneficial when you want to prevent accidental changes or replacements. To make any modifications to a locked item, you will need to unlock it first.
![]()
Loop Item: The loop feature allows an item to play multiple times within your schedule. For instance, if you schedule a 15-second item for 30 seconds on loop, it will automatically play twice during that timeframe.
![]()
Locate File: This tool enables you to quickly find the corresponding file in your Library widget, facilitating easier content management.
Change Duration: You can adjust the duration of an item in your schedule, which is especially useful for images or when the looping feature is activated. Alternatively, you can directly click on the duration displayed in the schedule to modify it as needed.

SCTE-35 Splice Event: Enables or disables the triggering of an SCTE-35 event during playback of the scheduled item.
Create Schedule Block: This feature allows you to establish a new schedule block at your selected time. To learn more about the functionality and benefits of using blocks, refer to the article on Block Scheduling. Also available on the action dropdown of an empty slot.

Create Empty Timeslot: Use this option to add a new timeslot to your schedule at a specific time that is not currently listed. For instance, you can create a timeslot for 8:10 AM. After the timeslot is established, you can utilize the Click & Stick feature to easily assign your content to that newly created time. Also available on the action dropdown of an empty slot.