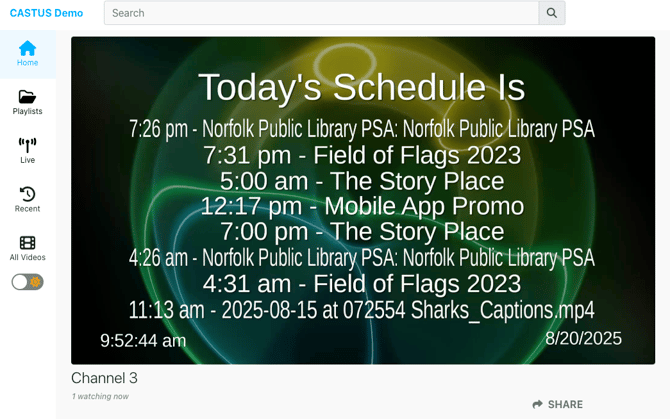
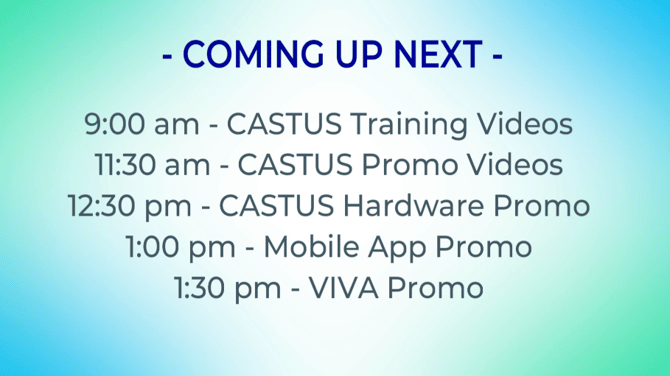
Showcasing a “Coming Up Next” guide in CASTUS Cuts empowers your audience with real-time visibility into your upcoming programming. Seamlessly integrate this guide as part of your default item or display it after each program ends, providing viewers with clear, immediate insight into what’s scheduled next and throughout the following hours.
Tags that pull data from your schedule will not display content within the CASTUS Cuts project itself. To populate these fields, make sure they are added to a schedule that contains scheduled content.
Understanding the basics of CASTUS Cuts is helpful but not always needed. For additional information about CASTUS Cuts, visit the CASTUS Cuts article.
Using a Coming Up Next Template
Each server is equipped with a number of Coming Up Next templates you can modify or plug and play in your schedule.
Plug and Play
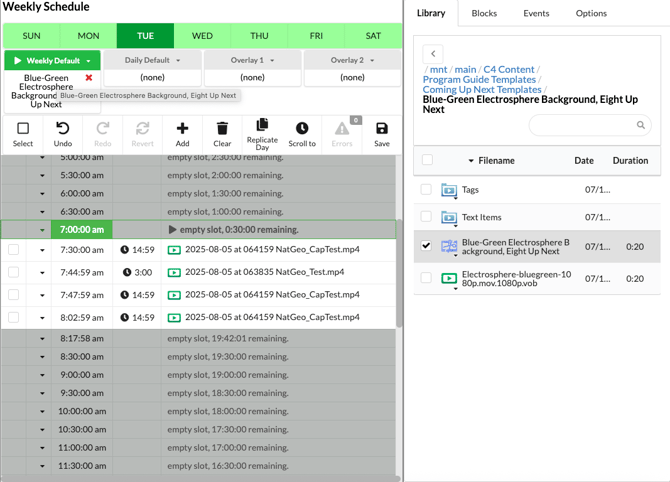
- Open your active schedule file.
- In the Library widget on the right, select C4 Content > Program Guide Templates > Coming Up Next Templates.
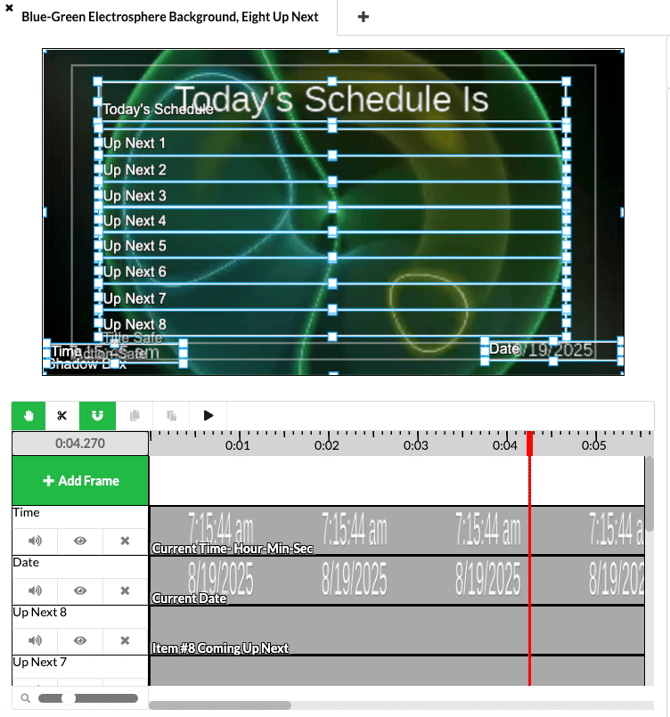
- Double click the folder of the template you want to choose. To view the template, double click the CASTUS Cuts project file. You will not see the text populate in the CASTUS Cuts project but you will see it pull data from your schedule once added to your schedule and saved.
- Return to your schedule by choosing the schedule tab at the top of the page.
- Single click the CASTUS Cuts project file.
- Click in your schedule or into your schedule default to stick it to your schedule.
- Save your schedule.
Modify a Template
- Open up your Library and navigate to C4 Content > Program Guide Templates > Coming Up Next Templates.
- Double click on the folder of the guide you want to modify.
- Double click on the CASTUS Cuts project of the project you want to modify.
- Common modifications are changing the background or adding a logo.
- Changing the background:
- To change the background, identify the background layer of the project. This is typically the bottom region and often labeled "Background" in the template project.
- Single click on the item within the region and press backspace on your keyboard to delete.
- Navigate to your replacement background in the library widget on the right.
- Click and stick your background into the "background" or bottom region. Your background should fill the screen.
- Enter a duration if prompted, or click and drag the right edge of the background item to match the rest of the regions above.
- Select the save button and choose Save As.
- Name your project and navigate to the Projects folder in mnt/main to save.
- Adding a logo:
- To add a logo or image, navigate to the file in the library widget on the right.
- Click once to select the file.
- At the top of the project, click in the white space next to "add frame" to create a new region.
- Enter a duration if prompted, or click and drag the right edge of the item to match the rest of the regions below.
- Place and size the image on screen.
- Select the save button and choose Save As.
- Name your project and navigate to the Projects folder in mnt/main to save.
- Open your active schedule file.
- In the Library widget on the right, select C4 Content > Projects.
- Single click the project file you want to add to your schedule and click in your schedule or in the default to add it to your schedule.
- Save your schedule.
Creating a Coming Up Next Project from Scratch
Coming Up Next projects require a number of layers, such as a 16 x 9 background image or video, several scrolling text layers, and possibly a logo or other image.
Scrolling Text Items & Text Syntax
Scrolling text can scroll or be static on-screen. For this full-screen Coming Up Next example, the scrolling text will be set to static, not moving under Scroll Speed.
You can use the pre-made text items in the C4 Content > Program Guide Templates > Coming Up Next TAGS folder, or you can create your own. Follow the steps in the Text Items and Scrolling Text article to create your own, substituting the below syntax for the announcement items.
Below are the items needed to pull data from your schedule. They can be individual layers or included as a multi-line single layer.
| Syntax | Example |
|
%{time;next;1;12h,ampm}% - %{title;next;1}% %{time;next;2;12h,ampm}% - %{title;next;2}% %{time;next;3;12h,ampm}% - %{title;next;3}% %{time;next;4;12h,ampm}% - %{title;next;4}% %{time;next;5;12h,ampm}% - %{title;next;5}% %{time;next;6;12h,ampm}% - %{title;next;6}% |
10:00 am - A Walk in the Garden Ep. 5 11:00 am - McGold-RIFFS w/ Mike V. 12:30 pm - Fire Station Open House 1:00 pm - Therapy Chat Ep. 24 2:00 pm - Yoga with Ginny Ep. 121 3:30pm - The Story Place Ep. 21 |
|
Use |
Syntax |
Example |
|
Current Date |
%{date}% |
08/19/2025 |
|
Date with Formatting |
%{date;now;;mm/dd/yy}% |
08/19/25 |
|
Current Episode |
%{episode}% |
A Walk in the Garden |
|
Next Episode |
%{episode;next}% |
Ep. 151 |
|
Next Title |
%{title;next}% |
Bill McGold-RIFFS |
Background
There are a number of pre-loaded animated and still backgrounds in the C4 Content folder that you are free to use. You can also upload your own image or video to use as a background.
Assembling Your Project
Once you have gathered your text items, background, and any other elements you want to add, you're ready to create your Coming Up Next project in CASTUS Cuts.
- Navigate to CASTUS > CASTUS Cuts.
- Locate your background image or video in the library widget to the right of your project.
- Click once to select, and click into the white area next to "Add Region" to create a new region with that content.
- Locate your first text item in the library widget to the right. This could be a Coming Up Next title, the date or time, or the first item you want to announce.
- Click once to select, and click into the white area next to "Add Region" to create a new region with that content.
- It will likely appear full-screen above. Use the bounding box to size and place your item where you want to see it. If you brought in an item with syntax, you will not see it populate in the CASTUS Cuts project. Make the box as wide and as tall as you want to see your text.
- Repeat steps 5 & 6 with additional layers.
- Save your project.
Seeing Your Coming Up Next Project Live
- To see the Coming Up Next project live on your channel, click and stick the cuts project into your schedule or into your default item and save your schedule.
- As long as you have content scheduled, you will see the slide populate based on the syntax you used in your project.