
Download PDF Version
.png?width=670&height=867&name=Group%201974%20(2).png)

Congratulations
on purchasing your new playout server!
Welcome to the CASTUS Community!
Email us at training@castus.tv to set
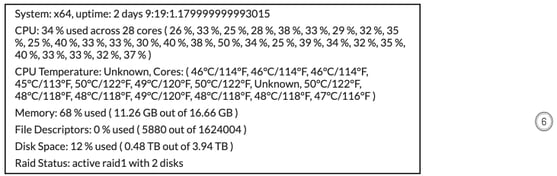
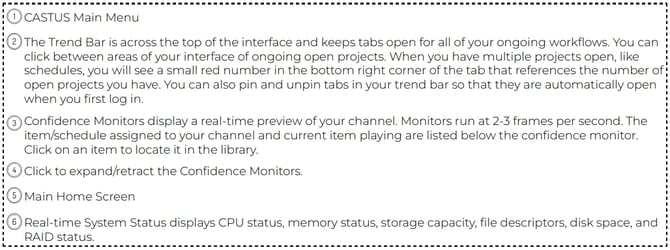
up your CASTUS training appointment.
 CASTUS Setup Guide
- Connect to your unit using the following:
- Power cable (included with your server)
- Ethernet cable
- Keyboard
- Mouse
- Monitor (connected via VGA)
- For QuickRoll units only, first install the hard drive(s) included in the shipping box. See the Installing Hard Drives on New Units section before proceeding.
3. To power on the unit, press the toggle button located behind the right door on the front of your server.
NOTE: There is a red reset button in the same location. This is NOT the power button.
-
- Login: root (all lowercase)
- Password: cm#Rv4Ua
NOTE: Characters will not show but it is typing.
5. Type “net-ui” and press ENTER to bring up the Network Configuration Interface.
6. Take note of the IP address next to the line item “IPV4”—this is the IP address you will insert into the browser for future access.
7. Exit back to the command line.
8. Start the graphical desktop display by typing “startx” and pressing ENTER.
9. Click on the CASTUS start icon in the lower left corner of the window. Select Firefox to bring up our CASTUS web interface for the localhost only. For remote access to the CASTUS web interface, enter the IP address noted above. Close Firefox when not in use. 
Next Step: Changing Your Password
We recommend changing the root password on your CASTUS server immediately after setup. It is recommended that your password be at least 8 characters long and include the following within the first 8 characters:
- 3 special characters, e.g. @#$%^&*()_+
- 1 capitalized letter
- 1 lowercase letter
- 1 number
To Change Your Password
NOTE: This process must be done locally at your CASTUS unit.
- Click the start menu and open the Terminal Emulator.
- Type “passwd” and hit ENTER.
- Type in your new password and hit ENTER.
NOTE: Characters will not show but it is typing. - Re-enter your new password.
NOTE: Characters will not show but it is typing. - Select ENTER and close the Terminal Emulator.


If you have any questions or need additional help, please email us at support@castus.tv.
CASTUS Support Guarantee
As part of our commitment to customer success, CASTUS provides comprehensive support and training to ensure your system launch is seamless and successful.
Standard Warranty and Support
All CASTUS products include the following:
- 3-Year Hardware Warranty
If any component fails within three years, it will be replaced. - Loaner Unit Support
In the rare event of a total system failure, CASTUS will immediately send a replacement loaner unit. If your server needs to be replaced, our team will guide you through the exchange process. - Start-Up Support Bundle (Included with every new system)
- Up to 4 hours of personalized training
- For support, please email support@castus.tv. This will automatically create a support ticket in our system. Our support team will respond as availability allows and based on the severity of the issue.
For guaranteed, dedicated support, we recommend subscribing to C4 or C8 support plans.
Optional Services (Available at an Additional Cost)
- Extra training sessions (billed hourly)
- Software upgrade assistance (billed hourly)
Ongoing Support Plans: C4 & C8
To ensure continued success and maximize your system’s performance, we recommend enrolling in CASTUS C4 or C8 Support Plans.
Support plans include:
- Priority phone and email support
- Access to ongoing software updates and new feature releases
To upgrade, contact billing@castus.tv.
C4 Support Plan – $1800/year
Includes:
- Exclusive Access to the Knowledge Base: Enjoy extensive knowledge base articles to answer all your questions plus access to updates.
- Dedicated Email Support: Emails generate support tickets automatically and alert our team instantly.
- Live Representative Access: Speak with a CASTUS representative live from 9:00 AM to 5:00 PM PT.
- "Tech Support Connect": Enable our technicians to log in remotely for troubleshooting assistance.
- Software Updates: Receive regular updates to ensure optimal performance.
- Training Sessions: Two scheduled training sessions annually for onboarding new employees or providing refreshers for existing staff.
- In-Depth Technician Sessions: Two scheduled, comprehensive sessions per year with a CASTUS technician.

C8 Support Plan – $2800/year
Includes everything in the C4 plan, plus:
- Dedicated Email Support: Use a unique email address that generates a support ticket and immediately notifies our team.
- Live Representative Availability: Connect with a CASTUS representative from 9 AM to 5 PM PT, with an emergency after-hours call-in option.
- Tech Support Connect: Receive direct troubleshooting assistance from a CASTUS technician who can log in and address issues.
Regular Software Updates: Stay current with ongoing enhancements to our software. - Annual Training Sessions: Receive four scheduled training sessions for onboarding new employees or providing refresher courses.
- In-Depth Technical Sessions: Participate in four scheduled, comprehensive sessions annually with a CASTUS technician.
To upgrade, contact billing@castus.tv.

Table of Contents
Installing Hard Drives on New Units (QuickRoll ONLY)
Moving and Copying Files in Your Library
Using FTP to Import Files to CASTUS
Copying Files from an External Drive to CASTUS
Uploading a File From Your Personal Computer
Adding Additional Metadata to Your File
Recommended Metadata Tags for Schedule Guide and VOD
Applying Metadata Templates to Media Items
Replicating a Block to All Instances
Assigning a Schedule to a Channel
Assigning an Item as Background Music
Accessing the Input Controls Page
Installing Hard Drives on New Units (QuickRoll ONLY)
 QuickRoll units have more than 1 drive (forming the RAID) and the drives are not installed in the QuickRoll chassis itself to prevent damage to the drives and the "drive bays" during shipping. The drives are shipped in the same cardboard box in antistatic bags covered in bubble wrap and inserted into the front and back foam pieces. There are 3 available drive bays in the QuickRoll, but typically only 2 drives are installed, leaving 1 spare bay.
Installing the Drives
- Position yourself in front of the CASTUS unit so you can see the front decals, keylock, and left and right doors.
- Rotate the latch around the keylock to the vertical position so it is unlatched.
- Open the left outer door by inserting your left hand fingers under the right ridge of the door, as shown in the diagram below, and pulling out on the door.

- Once the outer door is open, for each of the drive bays place your fingers under the release (⅓ of the distance from the left), and pull out to open the drive bay.
- Position the drive label up with the connector at the back bottom of the drive.
- Carefully keep the drive level and slide it partially into any of the slots as far as it will go without resistance. The drive order does not matter.
- Next, close the inner door gently, which will force the drive to slide the rest of the way in.
- You should feel mild resistance as it slides into the connector.
- Repeat for the other disk drive(s).
- Close the outer left door and rotate the keylock to the horizontal position to latch.
NOTE: If multiple CASTUS units are shipped to one customer, then the CASTUS serial number will be visible on the drive to make sure they go in the correct CASTUS.
The Home Screen
Welcome to the CASTUS Home Screen, designed to be simple and easy to use. From here you will be able to access all of the tools available inside and around the CASTUS QuickRoll and QuickCast.

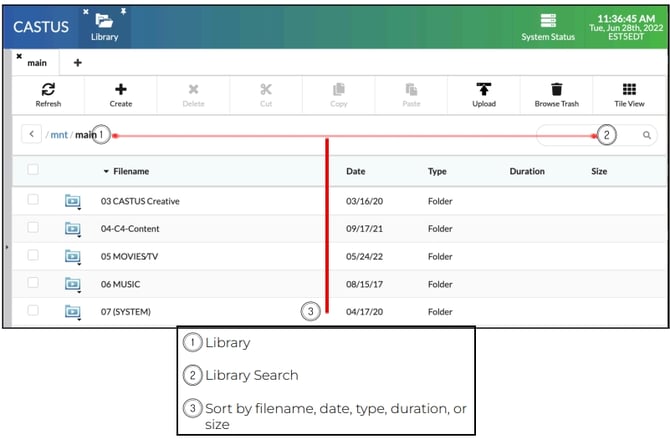
The Library
 The Library in CASTUS is a file manager. The library works just like a Mac or PC. You can create folders and subfolders; move, copy and delete items; rename files; and more.
In the Library there are folders that will automatically appear as soon as you create new Metadata Templates, Playlists, Projects, Recordings, Incoming Uploads, Schedules, RSS Feeds, and Text Items for the first time. We call these folders “action folders,” which have unique icons to help you differentiate them from the standard folders in your library. These folders will be the default location for newly created media items. For example, if you create and save a text item, it will automatically save the new file in the Text Items folder. This is true for all action folder media items when created from the Create button on the homescreen or from the CASTUS Main Menu.
Folders in Your Library
The CASTUS Library is preloaded with default folders. It is also possible to create and manage your folder structures. We recommend creating a master folder in the main directory and subsequent folders based on channels, shows, genres, archives, etc.
NOTE: After you’ve scheduled media items from a folder, do not change the name or location of the folder or media item. It will break the link between the schedule and the media item and your media item will not play. When scheduling media items, make sure they are in their final place within your library before adding them to a schedule. You can make copies of these files and move the copies around your library.
Below are some tools we would like to highlight in the Library:
Creating New Folders
- From the home screen click the Library icon.
- Navigate to where in your library you wish to create a new folder.
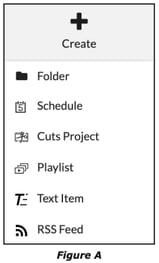
- Click the Create button and then select the Folder option in the drop-down tabs below (Figure A).
- Name your new folder, then click Submit.
- You can now copy or move media items into your new folder. You can also create subfolders within folders.
NOTE: Folders can be scheduled. To do this you must first create metadata for the folder (see the Metadata section). When you create metadata for the folder, the folder icon will change to have a play icon inside of it. Folders have no duration, but a duration metadata tag can be assigned.
Moving and Copying Files in Your Library
In the CASTUS Library, you can move files from one location to another or copy and paste from one location to another. Both are very similar in operation.
- First navigate to the folder containing the file(s) you wish to move or copy.
- Using the check box, select the file(s) you wish to move or copy. Any number of media items or folders can be selected.
- Select Cut or Copy from the options menu.
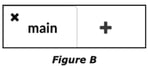
- Navigate to the folder you wish to move or copy your file(s) to. You can click on
the plus icon next to the Main tab to open a new Library window (Figure B). - Select the Paste option at the top of the window to paste your content into its new location.
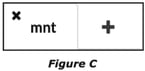
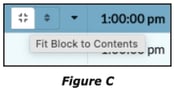
NOTE: Once you have scheduled files, do not rename them or move them around in your Library. You can copy and paste them, but if you move/cut them they will go offline and will be highlighted in red in the schedule (Figure C).
If they go offline, the schedule will play the default item (see the Default Items section). If there is no default set, the schedule will cut to black. You can reconnect the media item by moving the file to the original location or renaming it back to the original name. Alternatively, you can replace it from its new location.

Acquiring Content
Using FTP to Import Files to CASTUS
 Importing a large number of files to CASTUS can easily be accomplished by setting up a FTP program that will enable you to drag and drop multiple files into your CASTUS Library at once.

- To use a FTP program in CASTUS you will first need to turn on the FTP Access in the Services page. Do this by selecting Services from the CASTUS Main Menu, then navigate to the System Services tab.

- Locate FTP Access and choose Start.
- Open your FTP program—in this example we use FileZilla.
- Click on the Site Manager icon in the upper left-hand corner of the FileZilla interface (Figure A). It will open in a separate window (Figure B).
- Select New Site, then name the new site.
- Under the General tab, enter the information for your server. The Protocol SFTP (on the pull-down menu) is recommended in general as it is much more secure than FTP. FTP can be used on a local network but it is not recommended for use over the internet.
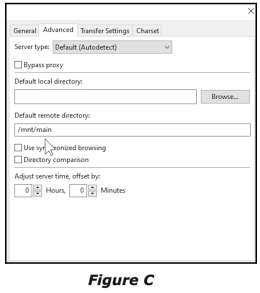
- Under the Advanced tab, enter “/mnt/main” in the Default Remote Directory field (Figure C).
- Click Connect. This will open up the library directory for your computer on the left side and the library directory of your CASTUS on the right side of FileZilla (Figure D).
- On the left side, navigate to the folder(s) or file(s) you wish to copy.
- On the right side, navigate to the folder on your CASTUS you wish to copy to.
- Simply drag the folder(s) or file(s) you wish to copy to the desired destination and the transfer process will start automatically.

NOTE: No metadata will be created for the files when you use FTP. See the Metadata section for instructions on creating metadata.
NOTE: After your copy operation is complete we recommend you return to the services page and choose Stop FTP Access.
Copying Files from an External Drive to CASTUS
Unlike a PC or Mac, an external drive connected to CASTUS must first be "mounted" for CASTUS to read the drive. This prevents any foreign device from being automatically mounted.
Back to Table of ContentsMounting an External Drive
- Connect your external drive to your CASTUS server via USB.
- Open Firefox and enter your IP address to launch the CASTUS user interface.
- From the Home Screen select the Library icon.
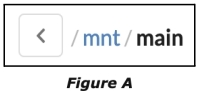
- Choose the mnt (mount) link at the top of the Library window in the file path (Figure A).
- The mnt directory will open and you will see the name of your external drive (if you have not given it a name it will be the device default name). To the far right, you will see that your drive says "Not Mounted." To mount your drive, select the action drop-down arrow to the left of the drive name and choose Mount.
- Once mounted, you can open the drive by double-clicking it.
- Navigate to the folder(s) or file(s) you wish to copy or move.
- Use the checkbox next to the item(s) to select what you wish to cut or copy.
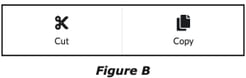
- Once the desired item(s) have been checked, select either Cut (move) or Copy (Figure B).
- Select the Main tab or open the Data folder to return to the main Library page. If the Main tab is not present, you can click the plus icon and a new tab will open on the Main page (Figure C).
- Navigate to the location of where you would like to paste the files.
- Select the button at the top that says Paste (Figure D). The Upload/File Transfer page will automatically open and display the file transfer progress.
NOTE: After this process is complete, you will need to create metadata for the transferred files. To do this, choose the action drop-down next to the file(s) and select Create Metadata. This can be done to multiple files at once.
NOTE: It is VERY important to "unmount" your drive before disconnecting it from the server. To unmount, return to the "mnt" tab, choose the action drop-down menu for your drive, and select Unmount. It is now safe to disconnect your drive.
Uploading a File From Your Personal Computer
- To upload new media items to CASTUS, choose the Upload button on the Home Screen or go to the CASTUS Main Menu and choose Upload.
- Select the Choose File button (Figure A).
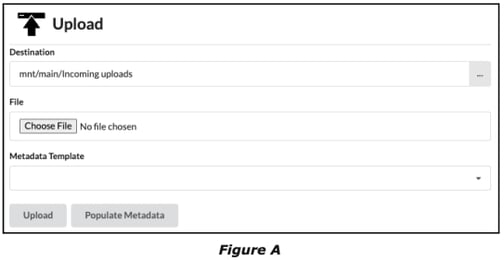
- Use the browse function on your computer to select the desired file.
- Once you have selected a file, choose Open in your desktop file manager.
- By default, the newly uploaded files will be sent to the Incoming Uploads folder. You can change the upload location of the file by selecting the ellipses icon on the far right side of the row titled Destination.
- Select Metadata Template and choose a template to apply to this upload.
- Select Populate Metadata to adjust metadata for this upload only.
- Select Upload to upload your new media item to CASTUS.
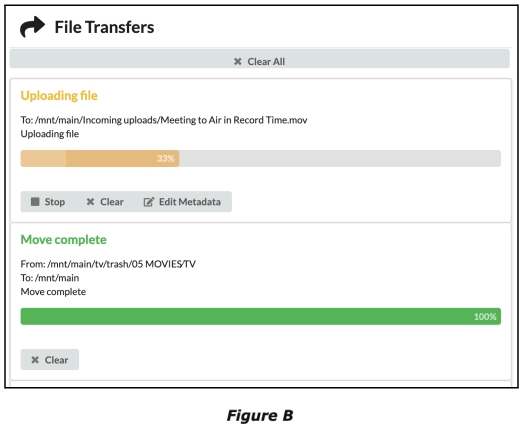
- The file transfers will be displayed in the right column of the uploads page (Figure B).
- Once the file is uploaded you can select the path of the file to be taken to its location.
NOTE: If you wish to upload to a specific folder in your library, you can also navigate to the folder within the Library widget and select Upload at the top.
NOTE: For larger copy operations, we recommend mounting your hard drive for a batch copy operation, or use an FTP client like FileZilla.
NOTE: To remotely access CASTUS off-site, you will need to have port forwarding enabled. You will need to work with your IT department to set this up.
Metadata
Metadata in CASTUS is extremely important and very powerful. Every media item in CASTUS must have metadata to play. CASTUS displays an icon next to the media item in the Library when it has metadata. Media items that will display icons are audio, video, and images (Figures A-C). If no icon exists, then the file does not have metadata. If you generate metadata for a folder, it will create metadata for all files and subfolders within that folder. Folders with metadata will be marked with a play icon on the folder (Figure D).

When a file is uploaded to CASTUS using the upload page, the following metadata tags are automatically created for it:
- Guid: A unique search ID generated for each media item inside CASTUS. This tag cannot be changed.
- Duration: The exact duration of the file in HH:MM:SS format.
- File Type: CASTUS identifies the file type of the specific media item
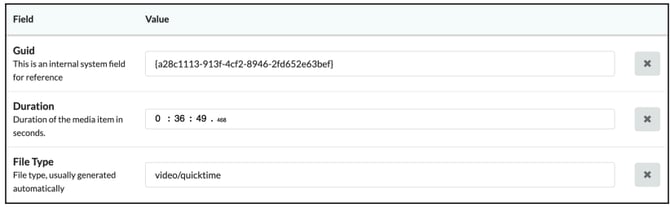
NOTE: Certain files, such as images, do not generate a duration tag. Images can still be scheduled; you will be prompted to enter the duration when scheduling or adding to a playlist editor. You can assign a duration tag to an image in the metadata editor.
NOTE: Files that have been copied from an external drive or copied to CASTUS using FTP do not auto-generate metadata. For files without metadata, you will have to create metadata manually. To do this, select one or multiple files you wish to create metadata for, click the action drop-down arrow and select Generate Metadata. This will automatically generate the metadata tags as described above.
Adding Additional Metadata to Your File
There are dozens of other metadata tags inside CASTUS that you can add to your files. See the Metadata Tags Glossary for a complete list.
To add additional Metadata Tags:
- Locate the media item.
- Click the action drop-down and select Edit Metadata (Figure A).
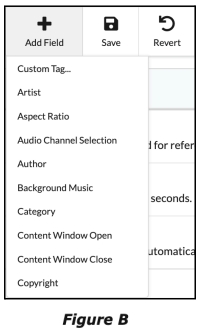
- In the Metadata Editor, click the plus icon and select any number of tags you wish to add (Figure B).
- In the empty field, enter the metadata information (Figure C).
- Save the metadata.


Recommended Metadata Tags for Schedule Guide and VOD
- Author: The name of the producer or the originator.
- Episode: The specific episode name.
- Program: The name of the program.
- Summary: A brief description of the video; a maximum of 50 characters is recommended.
- Title: The title of the program and how it should appear on the Schedule Guide and VOD.
NOTE: The program tag is used to auto-group programs on the QuickStream (Legacy) Video On Demand widget. These are case sensitive.
Metadata Templates
 Metadata templates allow you to apply multiple metadata tags to media items (Figure A). This can be done to a single item, a batch of items or even a folder. Metadata templates can be applied to items as they are being uploaded or once they are in the library.
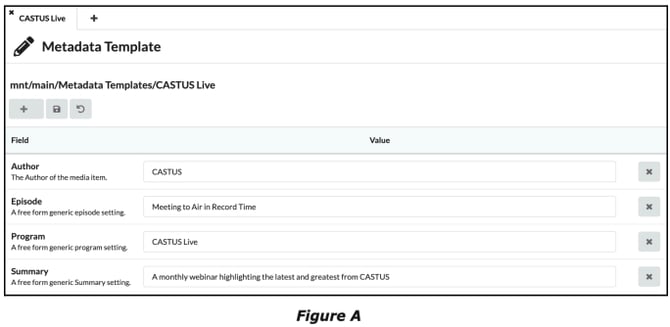
Creating Metadata Templates
- Select Metadata Template from the CASTUS Main Menu.
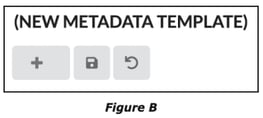
- Select the plus button on the top left of the Metadata Template page (Figure B).
- Choose one of the tags and enter a value in the empty space next to the tag.
- If you wish to create your own tag, select Custom Tag to bring up a dialogue box. Name the tag and select Submit, then enter the value for the tag.
- Click the save icon, name the template and select Submit. Your saved templates will be saved in the Metadata Templates folder of your Library.
Applying Metadata Templates to Media Items
- Navigate to the Metadata Templates folder.
- Select the action drop-down for your desired metadata template.
- Select Copy Template Metadata.
- Navigate to the file you wish to paste the metadata to select the action drop-down.
- Select Paste Metadata.
NOTE: If you wish to apply a metadata template to multiple media items at once, click the checkbox to the left of each item you wish to select, click the action drop-down of one of the selected items and select Paste Metadata.
NOTE: You can apply metadata templates to media items while they are uploading by selecting the template from the Metadata Template dropdown on the Upload page. If you choose populate metadata after choosing a template, you can change the values for the specific video you’re uploading without changing the values of the template.
Schedules
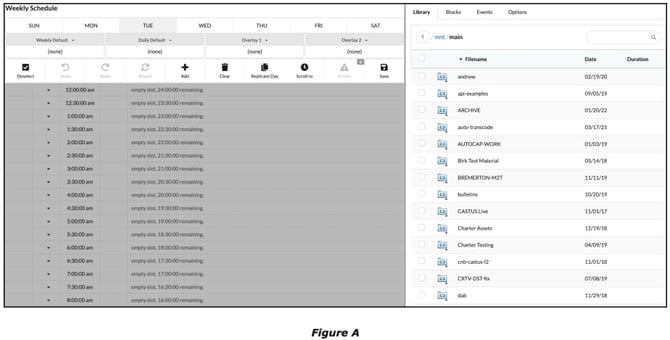
 In the Schedule Editor, you can create and save schedules that can then be assigned to any channel. Schedules are saved in the Schedules folder in your Library by default. There is no limit to the number of schedules you can create. The image below (Figure A) highlights the schedule editor interface. In this example, we are using a weekly schedule. It is possible to create a schedule file for a single day, week, month, year, endless, or a custom number of days known as an interval schedule. We recommend a weekly or yearly schedule for most standard operations and best reporting results.
- Day: Specific to the time of the day of any day.
- Week: Specific to the day of the week for any week.
- Month: Specific to the day of the month for any month (e.g. an item scheduled on the 5th will play the 5th of each month).
- Year: Specific to the month and day of any year.
- Endless: Specific to the unique date and time.
- Interval: Create a schedule any number of days long (does not refer to any dates).
Creating New Schedules
- From the Home Screen choose Create then select Create a Schedule to Synchronize Media Items.
- Select your desired schedule format and name your schedule, then select Create.
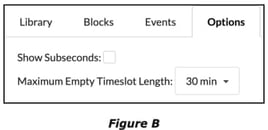
- By default, time slots are by the half-hour. This time slot interval can be changed at any time in the Options tab in the Library widget (Figure B).
- You can also create custom time slots (one at a time) by choosing the action drop-down arrow next to any time slot and selecting Create Empty Time Slot. A pop-up window will prompt you to enter a time. Enter the desired time, select AM or PM, then click OK. The new time slot will appear in your schedule.
Scheduling a Media Item
- From the Library widget on the right within the Schedule Editor, navigate to a media item you wish to schedule.
- Select the item in the Library by clicking it once.
- Click on an empty time slot to stick the item to that time slot. We call this Click & Stick Scheduling.
- While the item is still selected, you can continue to stick it to any number of time slots on any day.
NOTE: Click & Stick will auto calculate the next available time slot based on the scheduled item(s) duration.
NOTE: You can select multiple items within your library to Click & Stick into your timeslots. The order that you select the items in the library is the same order that they will be added into your timeslots.
Default Items
Above the schedule is a slot labeled Weekly Default (or Yearly Default, Monthly Default, etc, depending on your schedule type). We call this the Global Default. The item assigned to this slot will play when nothing is scheduled. The Default item is designed to loop, meaning they do not start at the beginning every time there is a gap in your schedule. Default ensures that there is always something playing on your channel if your schedule is assigned. Any media item in CASTUS, including projects, simple playlists or folders can be assigned to Default.
![]()
Next to the Weekly Default is a slot that reads Daily Default. This slot works the same way as the Global Default, but if you are on a schedule with multiple days it allows you to set a specific default item for each day. The Daily Default item overrides the Global Default item on that specific day.
Overlays
Next to the Default slots are two slots labeled Overlay 1 and Overlay 2. Overlays are a great way to insert a station logo or bug on top of scheduled programming. Overlays are designed to take up the full screen, and as such we recommend using a PNG that has been sized to fit the screen with the image in its desired location of the screen. You can also bring the media item you wish to display into a CASTUS Cuts Project, size and place it as desired, then assign the new project to the Overlay slot.
Schedule Blocks
 Schedule Blocks are used for main and recurring programming you want to add to your schedule. Schedule Blocks are made within the Schedule Editor and can be assigned across one or multiple days. These blocks are then filled with the content you want to play at the scheduled block times.
NOTE: Blocks will be replacing Events. While Events are still currently available, we recommend making the switch to Blocks, as Events will be removed in a future update.
The Block Manager
On the right hand side of the Schedule Editor next to the Library tab is the Block tab; this is the Block Manager (Figure A). The Block Manager gives you the ability to create new blocks, color code, choose how they are announced in your schedule and view all times the block is scheduled. If you select a date and time when one of your blocks occurs, the schedule editor will automatically bring you to that date and time in your schedule. This makes it easy to navigate through blocks and adjust as needed.
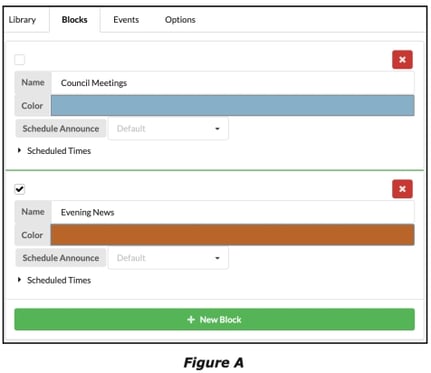
Creating a Block
- From the Schedule Editor, select the Blocks tab at the top of the library widget.
- Select New Block.
- Name your block then set a duration.
- A dialogue box will appear (Figure B), this is where you will schedule the block.
- Select the time you want the block to occur in HH:MM:SS AM/PM format.
- If you want to block to play at more than just one time, select Add Time.
- Select the day(s) you want the block to occur on at the selected times. These will populate as you select the days. If you accidentally click a day you don’t want the block on, simply click the red X next to the day and time you wish to delete.
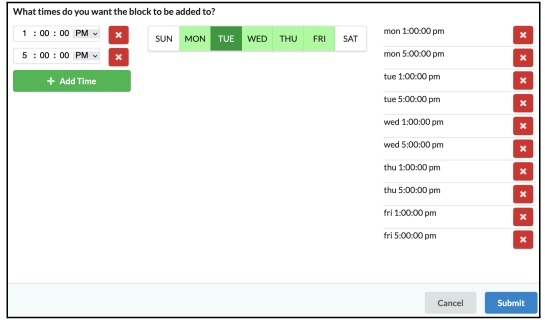
NOTE: It is important that you add the time(s) first, then the dates.
- When you are done scheduling the block, select Submit. This will bring you back to the schedule page with your block at all of the timeslots you just selected.
Assigning Items to a Block
Once the block has been created you will then fill it with the programming you want to play during that time. Adding media items to a block is the same process as explained previously in the Scheduling a Media Item section. This process only needs to be done on one block, which can then be replicated to all other instances.
- Switch back to the Library tab in the Schedule Editor
- Find the item(s) you wish to schedule in the block
- Click & Stick the item(s) to the timeslot(s) inside the block
NOTE: If the total duration of the content you added does not match the length of the block, you will receive an error. To resolve the error you can select Expand Schedule below the added content or choose the icon to the left of the block title that has four corners to Fit Block to Contents (Figure C).
Replicating a Block to All Instances
Once you have scheduled one block and fit it to the contents, you can easily replicate that block to all other blocks of the same name by choosing the icon to the left of the block with the up and down arrows to Replicate Block (Figure D).
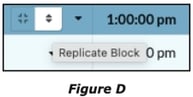
NOTE: There are two other options for replicating: Replicate Block Backward, which will replicate to all blocks of the same name before the selected block, and Replicate Block Forward, which will replicate to all blocks of the same name after the selected block.
If you are using monthly or yearly schedules and would like to archive the schedule, we recommend replicating forward.
Replicating backward is recommended when you are working in a weekly schedule that loops week to week. If you have new programming mid-week, but need to finish out the week with the current content, replicating backward allows you to prepare the new content for the following week without disrupting upcoming blocks.
Saving Your Schedule
Once you’ve finished your schedule, select the Save button. Name your schedule if you haven’t already and select OK. Your schedule will be automatically saved to the Schedules folder in the Library; if you refresh or close your browser before saving you will lose your work. If you wish to use an already created schedule as a template without affecting the original schedule, select the Save As option.

Assigning a Schedule to a Channel
The final step in making your schedule file active is assigning the schedule file to any of your channels. Your schedule file will not play until it is assigned to a channel.
To assign your schedule:
- Select the channel from your confidence monitors by clicking in the middle of the confidence monitor for your desired channel. A white highlight will appear around the confidence monitor for the channel that is selected.
- From the CASTUS Main Menu or the Home Screen, choose Library.
- In the Library, navigate to the schedule file you wish to assign to your channel. Schedules are saved to the Schedules folder by default.
- Select the action drop-down arrow of the schedule and choose Assign to Channel…
- A dialog box will prompt you to confirm the assignment of the schedule to the channel. Click Yes.
- The schedule will sync with the system clock and automatically pick up where it should be.
- Once a schedule is assigned to a channel, you can open the schedule by selecting the channel confidence monitor, and then selecting the Schedule button from the CASTUS Main Menu or the Home Screen.
NOTE: While the Play Now option is available, we do not recommend using the Play Now option with schedule files. Selecting Play Now will only play the schedule once through, and does not assign it to that channel. Assigning an item to your channel will loop that item on your channel until you manually assign something else.
CASTUS Cuts
 The CASTUS Cuts page operates as a basic non-linear video editor, allowing you to arrange any number of media items in regions within CASTUS Cuts. You can trim clips, stack multiple videos and graphics on top of one another, save and play the CASTUS Cuts item with no rendering or exporting. CASTUS Cuts are commonly used for creating bulletin boards and slide shows. CASTUS Cuts are non-destructive to the original files.
NOTE: There is currently no audio preview in CASTUS Cuts.
Controls and Display
The CASTUS Cuts Controls (Figure A) allow you to change the overall settings for your CASTUS Cuts.
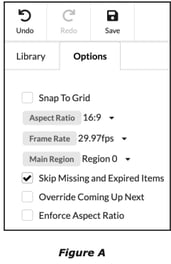
- Aspect Ratio: Change your CASTUS Cuts aspect ratio with this drop-down, set a custom option. The default is determined by the aspect ratio of the channel currently selected.
- Frame Rate: Change your CASTUS Cuts frame rate with this drop-down, including a custom option. We recommend 29.97.
- Skip Missing and Expired Items: Automatically skips inactive media items that have been assigned a Content Window Open/Close metadata tag. Closed Items are displayed in red within the library.
- Override Coming Up Next: When selected, the Project will not display on your Coming Up Next List.
- Enforce Aspect Ratio: Enforces the aspect ratio of your project to remain as you set it, and not the aspect ratio of your channel.
Actions for CASTUS Cuts include Undo, Redo, and Save.
The Canvas (Figure B) is where you’ll adjust the size and position of the regions in your CASTUS Cuts project. This preview shows multiple regions layered on top of each other. Each of the regions can be scaled and moved independently. Title and Action Safe margins are shown to ensure overlays are visible on as many screen sizes as possible.
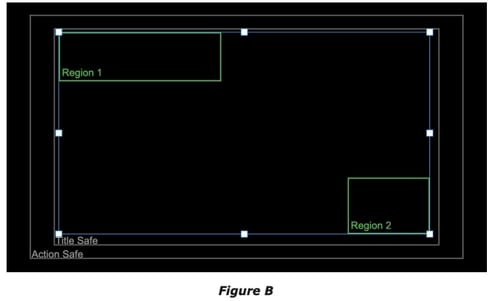
NOTE: To add a dynamic text layer, create a text item by choosing Scrolling Text from the CASTUS Main Menu. Change the scroll speed to Static, Not Moving for static text. Click & Stick the text item into your cuts project and adjust the region as desired.
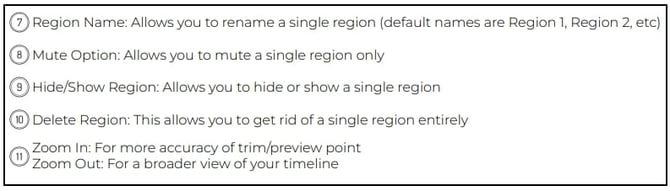
The Timeline
The Timeline in the CASTUS Cuts Editor allows you to add and delete regions, stack regions on top of one another, and trim, play, copy, and paste clips. It also allows you to control content in each of the regions.

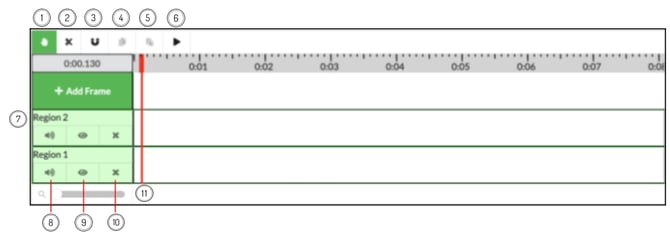
NOTE: You can use the left/right arrows on the keyboard to step frame by frame and the up/down arrows to skip between clips.
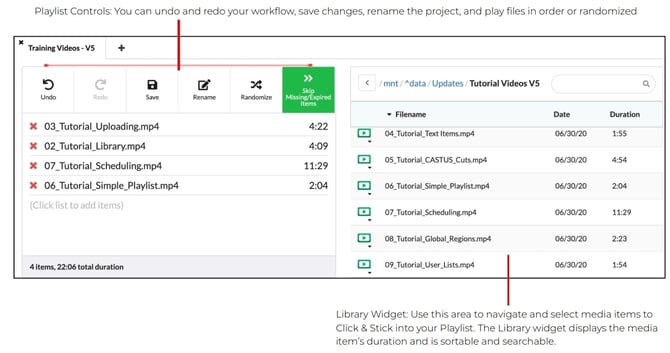
Simple Playlist
 The Simple Playlist page operates as a list of files from your CASTUS library, to be played sequentially or in a shuffled order. This allows you to arrange any number of media items within one single playlist. You can simply Click & Stick items from your library into a playlist and play them in order or select random. If you want a specific order for the items in your simple playlist you can click and drag them within the Playlist Editor to rearrange. When you are happy with your playlist make sure to save your project.
Building Your Simple Playlist
Media items show up in the order they are placed. You can then randomize the order, or let the items play in the order they were placed. You can add text items, videos, still graphics, and CASTUS Cuts projects into your playlist. To remove an item from the Playlist simply click the red X next to the item you wish to remove.
Text Items
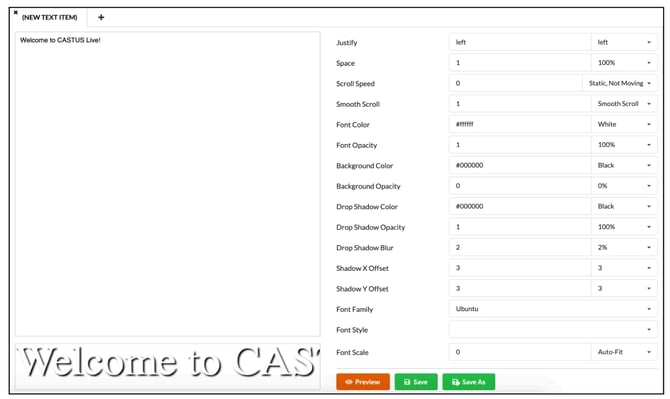
 Within CASTUS you can create any number of crawling or static text items. These text items can be scheduled, used in CASTUS Cuts projects, or assigned to any Global Media item. CASTUS supports .ttf or .rtf files for different font types that you would like to upload. The text editor allows you to control scroll speed, text color, background color, justification, drop shadow, opacity, and more.
Creating a New Text Item
- From the Create Page select Create a Scrolling Text Item.
- In the Text Workspace, type in the message you wish to create.
- Adjust the properties to customize your message.
- Select Preview to preview your text below.
NOTE: The text editor preview will not display the different font types.
- When you are happy with your text click Save and name your text item. Your text item will automatically save itself to the Text Items folder in your Library. If you have not created a text item yet, this folder will automatically populate in your Library after the first text item is saved.
NOTE: All sizing options are done by scrolling the text item inside a region of a playlist or Global Region.
Text Syntax
CASTUS has the ability to pull data relative to when an item is scheduled and display it on screen via a text item. This is especially useful for Coming Up Next slides as well as building out your bulletin board or announcing the current date and time as an overlay via Global Media. To utilize this feature, create a text item as noted above and include the following text depending on what you want to announce:
Coming Up Next
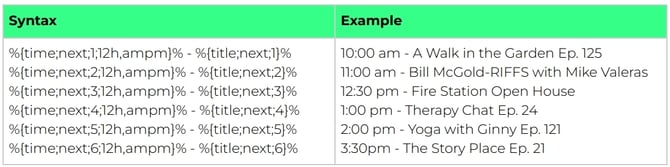
To exclude an item from the Coming Up Next slide, apply the metadata field Schedule Announce and set it to Never. This is useful for bulletin slides, short PSAs, as well as the Coming Up Next slide itself.
Additional Helpful Syntax
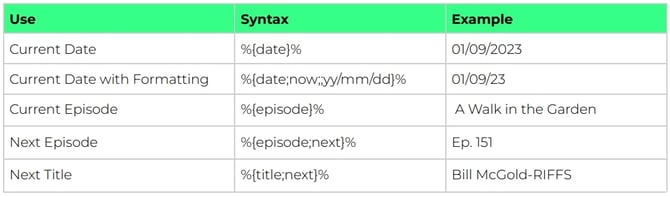
NOTE: Titles and episodes are populated by the metadata applied to your scheduled items for title and episode, respectively.
NOTE: When using these tags in CASTUS Cuts, you will not see the data populating (and will only see characters outside the %{ }% format). These items will pull data from the schedule in which it resides upon playback.
Background Music
The Background Music option ensures your channel never goes silent. From this page you can set audio to automatically play anytime there is a media item with no audio.
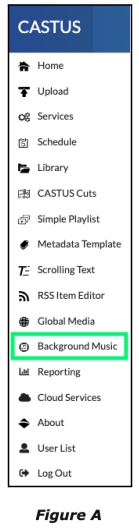
Assigning an Item as Background Music
- Access the background music page by using the CASTUS Main Menu and select Background Music (Figure A). This will take you to the Background Music page (Figure B), which will display the background item currently assigned, if there is one.
- Use the Library widget to navigate to the desired media item. Select the item.
- Choose Select Item as Background Music at the bottom of the page.
- Use the Default Policy to determine when and how a media item plays. The default policy options are:
- Always: This will play the media item’s audio on top of any other audio that might be coming from the channel.
- Never: This will not play the media items audio at all.
- If No Audio: This will play the media item’s audio if CASTUS does not detect any audio on the channel.
- Set the Audio Volume.
- Click Apply to make your changes take effect.
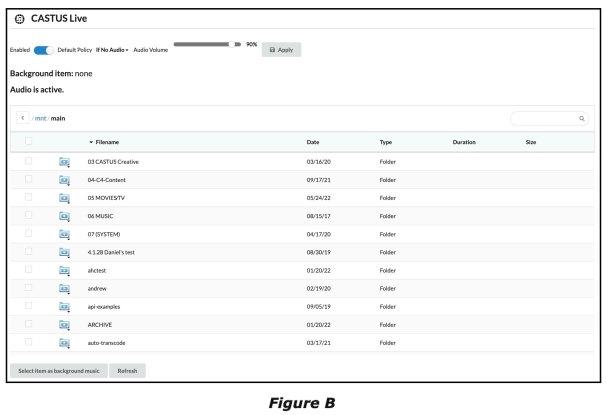
NOTE: You can assign any type of media item as your channel’s Background Music as long as it has audio. This includes videos, mp3’s, folders with music files, and schedule files. You can also assign an input, such as an external source plugged into the line audio input jack on the back of your unit or an IP Radio source.
NOTE: You can set each of your channels individually by clicking the confidence monitor for that channel to the left of your screen.
Global Media
The Global Media page (Figure A) is where you will create Global Media items. The Global Media items are overlays that play on top of your entire channel, regardless of what is assigned. They are most commonly used to brand and place text crawls on top of your channel(s). CASTUS allows you to create up to eight Global Media regions per channel. Global Media regions are designed to loop the media item inside the regions. Global Media can play any media item, including videos, text items, playlists, schedules, RSS feeds and live events, with or without transparency. Global Media will play on top of each channel creating a "picture in picture" effect.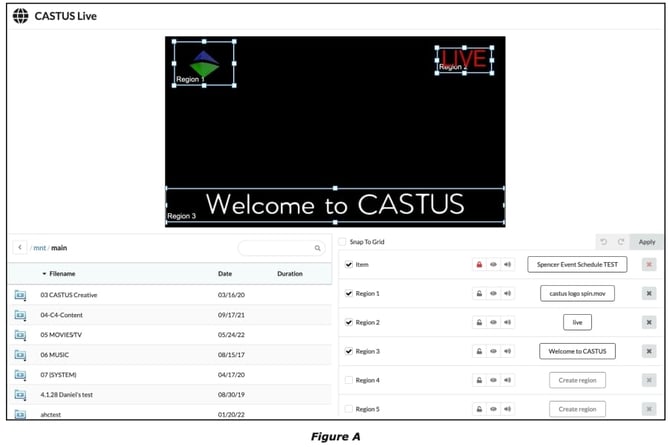
Creating a Global Region
- Go to the Global Media page by selecting Global Media (Figure B) from the Home Screen or the CASTUS Main Menu.
- There are eight regions to assign items to. To assign, select an item from the library widget, then click the rectangular space to the right of that region.
- To enable a region, click the box to the left of that region. The region will turn from red to white.
- You can scale and position the region anywhere on the screen. Click and drag on the corner of the region to resize. Click and hold in the center of the region to move the region around the canvas. Resizing the region will not affect the aspect ratio of the item assigned to it.
- You will see a preview on the canvas. The new region will not go live over the main channel until you select Apply.
Inputs
Inputs in CASTUS can be configured to play live and/or be recorded. Inputs can be either HD-SDI or IP video signals with embedded audio.
Accessing the Input Controls Page
- Select Services from the CASTUS Main Menu.
- Choose the Inputs tab to view all inputs.
- To access the Input Controls page, click on the Controls icon (Figure A) next to the input you wish to configure.
- You can also have quick-access to your inputs by selecting the inputs tab above your confidence monitors.
Configuring an Input
Your unit is shipped with the number of inputs you selected upon purchase.
- Select Services from the CASTUS Main Menu and choose the Inputs tab to view all inputs.
- Choose Settings next to your premade input to adjust the parameters as needed.
Timer Record Events
Timer Record Events are a great way to automate the recording process of an input. If you have a program coming into an input at a specific time, but can’t be there to start/stop the recording manually, simply create a Timer Record Event and CASTUS will handle it for you. You can also set it to repeat the recording, if the program you wish to record is a regular broadcast.
Creating a Timer Record Event
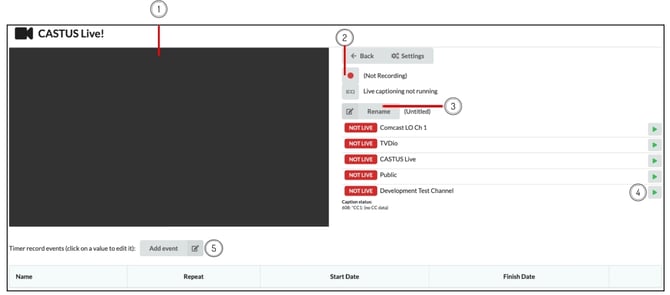
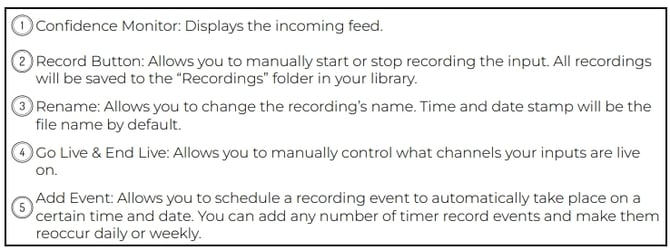
- Select Add Event below the preview window. This will bring up the Timer Record event Scheduler (Figure A).
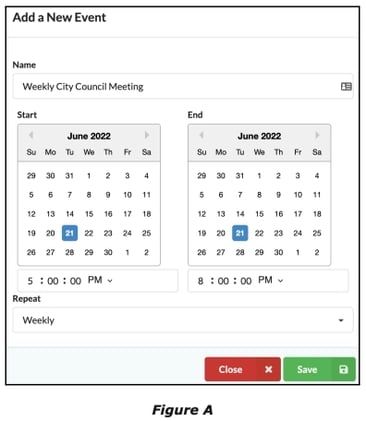
- Name the event.
- Apply a Start/End date and time.
- Select if and how you would like the event to repeat.
- Select Save. Pressing Close will cancel any changes and not save the event.
- Once the event is created it will display at the bottom of the page (Figure B). You can now edit or delete it.

NOTE: The recorded input file is a “clean feed,” meaning none of the overlays are on it.
NOTE: There is currently no audio preview in the recordings’ control monitor. If you put the input live on your preview or any other channel, audio meters will display.
NOTE: You can also set up CASTUS to control a router/switcher. This Knowledge Base article explains the process.
Scheduling an Input
You can schedule a live input to a time slot by Clicking and Sticking the input from the Library into an available time slot and assigning it a duration (Figure A). Follow the path main/tv/inputs to find your inputs in the library. If you schedule an input it will announce in your online schedule or coming up next slide as the name of the input. Your input can either be renamed to reflect a desirable name, or you can create a CASTUS Cuts project with the desired name, put the input inside the CASTUS Cuts and schedule the saved CASTUS Cuts project (Figure B).

Renaming an Input
- From the CASTUS Main Menu, select Services, then select the tab labeled Inputs.
- Locate the input you wish to rename.
- Click the Rename option (Figure C).
- Type in the desired name and select Submit.

NOTE: The input has to be stopped in order to rename it. You can immediately start it back up after the changes have taken effect.
Reporting
The Reporting feature allows you to view playback statistics of your content within the CASTUS server. There are three different types of reports: Channel, Inventory, and Runlog. Keep in mind these statistics are specific to the dates you previously blocked in the calendar.
Report Types
Channel: Shows you what Channel number you are on; Total Items, which is the amount of times all items have played; and Unique Items, which is the total number of different programs that have played (Figure A).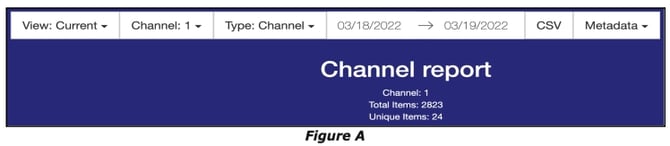
Inventory: Displays the File Name in the form of the file path; Play Count, which is the number of times each item has been played; Played Time, which is the total amount of time the item has been played; and First Play, which is the first time the item was played on the channel (Figure B).
Runlog: Displays the File Name in the form of the file path; the Duration; and the Start Time and Stop Time of each item (Figure C).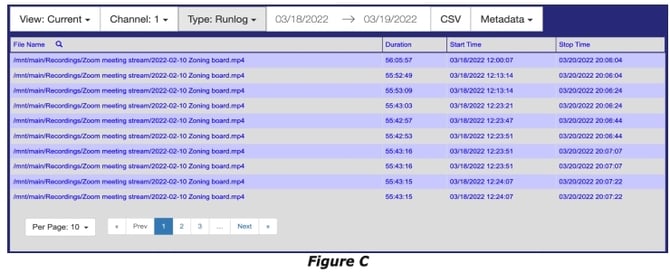
Creating a Report
- Select the Create button in the Home Screen.
- Select Create a Report at the bottom of the page.
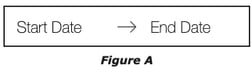
- Select the start date and end date for your desired playback report (Figure A).
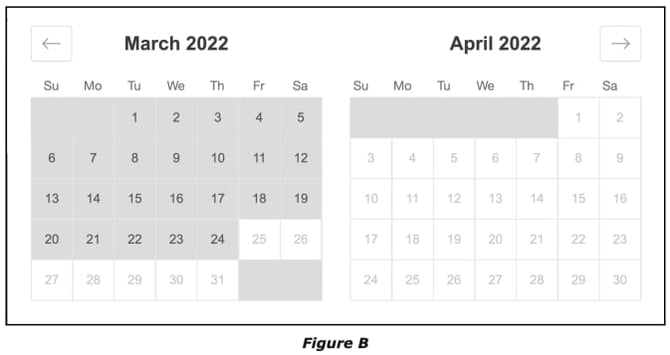
- This will pull up a calendar where you can scroll through month by month (Figure B).
- Select the dates you wish the report to reflect. The calendar will collapse when both a start and a stop date are selected.
NOTE: If you would like a downloadable Excel version of any of these reports, simply select the report type you want, set the parameters for the report and choose the CSV button on the top bar. This will begin the download to the computer you are on. When the download is complete you can find it in your computer’s Downloads folder.
User List
The User List allows you to create multiple users and assign varying permissions to each user. Give your team or community access only to the settings and services that they need.
NOTE: Root cannot be deleted or changed.
Add Users
- Choose User List from the CASTUS Main Menu.
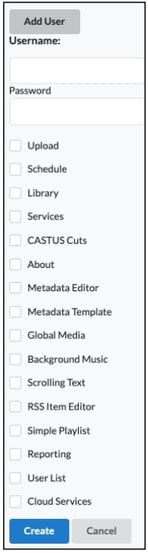
- Select Add User.
- Type a user name and password.
- Select the boxes next to each of the areas you want to provide access to for this user.
- Select the blue Create button at the bottom.
- The new user will appear in the list above.
Edit & Delete Users
- To edit or delete users, you must be logged in with a user account that has access to the User List settings, and is not the account you’re trying to change or delete.
- Choose User List from the CASTUS Main Menu.
- Check or uncheck the corresponding boxes for the user you want to change.
- Select the save icon to the far right of the user to save changes.
- To delete a user, select the trash icon to the far right of the user.
- To change the password of a user, select the pen icon to the far right of the user, enter a new password, and choose Submit.
NOTE: When starting a tech support session, the password that the CASTUS Support Staff will need is for the user "root."
Metadata Tags Glossary
Aspect Ratio
This value overrides the media item’s normal aspect ratio in case of encoding mistakes.
Audio Channel Selection
If set, the audio channel can be used to remap stereo audio channels in case of authoring errors or other problems with left and right channels.
One common mistake noted in some public/government access productions is putting all the audio in the left channel while the right channel is mute. The mono downmix option can be used to combine the two channels so that the mistake is less noticeable. If the missing channel is consistent, the user can use left or right to map the left or right channel into both speakers to compensate.
Another use of this setting is to allow VideoCD content from Asian countries to play normally where the left and right channels are used to carry two languages instead of stereo audio.
Author
This is a field intended to carry any free-form string describing the author or authors of the media item.
Background Music
This field determines how media playback is paired with background music. The default setting is empty, which means that background music is turned on if the item has no audio. For playlists and schedules, an empty value or missing tag means that the content within the playlist or schedule determines the background music state. If set, the setting overrides the background music for items, playlists, and schedules.
Valid values are On, Off, and If No Audio. “On” means that, regardless of whether the media item has audio or not, background music is switched on while the item is playing. “Off” means that background music is switched off whether or not the media item has audio. “If No Audio” means that background music will be switched off if the media item has audio, and switched on if the media item has no audio. This is the default.
Category
This is a field intended to carry any free-form string describing the user’s categorization of the file.
Go Live
This field holds a date in the form YYYY-MM-DD HH:MM:SS UTC (universal coordinated time). This timestamp is the time the content window “opens,” meaning that CASTUS is allowed to play this item. CASTUS will not play this item unless forced by “play now” if the current time is before this timestamp. If the field is empty or this tag is not present, then there is no minimum time that CASTUS is allowed to play.
Expiration
This field holds a date in the form YYYY-MM-DD HH:MM:SS UTC (universal coordinated time). This timestamp is the time the content window “closes,” meaning that after this time CASTUS is not permitted to play this item. CASTUS will not play this item unless forced by “play now” in that case. If the field is empty or this tag is not present, then there is no future time that CASTUS may no longer play the item.
Copyright
This is a field intended to carry any free-form string describing the copyright associated with the file. It may or may not contain the © copyright symbol.
Description
This is a field intended to carry any free-form string describing the file in-depth. Use the summary tag to carry a shorter one-line description of the content, i.e. for electronic program guide scenarios.
Downloadable
This tag overrides a selection of “Disable Download Button for Video Player on Google Chrome.” This allows you to make only certain files downloadable while preventing others from being downloaded. This pertains to QuickStream users.
Duration
This field holds a numerical decimal value describing the duration of the media item in seconds. Subsecond precision is allowed. If the media item has only an estimate of the duration, this field will contain the duration followed by “[estimate].”
DVB Content Identifier
This field holds a hexadecimal value that describes the content in terms of the coded value transmitted in countries that use the Digital Video Broadcasting standard.
Episode
This is a field intended to carry any free-form string that can be used as the “episode” of a program. This field is displayed by the CASTUS Video on Demand web interface below the name of the program or title.
Field Order
This field, if set, overrides the media item’s natural interlaced field order display. It can be used in case a media item is improperly encoded with the wrong field order or if the interlaced content is accidentally encoded as a progressive scan.
Valid values are None, Top, Bottom, and Inverse. “None” tells the media item to display the frames as a progressive scan even if encoded as interlaced. “Top” and “Bottom” both override the field order and force the specified field to display first. Progressive scan content will be displayed as if interlaced in this mode. “Inverse” overrides the field order by inverting it. Interlaced content encoded top field first will be displayed bottom field first, and so on.
File Type
This field is used by CASTUS to remember the file type that is detected with the item first had metadata created. This field is editable by the user in the unlikely case that CASTUS detects the wrong file type. The string is in Internet MIME type format.
In
This field is used to indicate how far into the program that CASTUS should start playing by default, in seconds. It is the “In” point that playback starts at instead of the beginning of the file. It can be used to skip extra long titles, black frames, or color bars encoded into the file at the beginning. If this field is not set, playback begins at the start of the file.
Inner Crop
This field holds a number from 0 to 100 (inclusive). It modifies how CASTUS fits the video frame to the screen in the case that aspect ratio conversion is needed. A value of 0 “zooms out” all the way so that no content is lost on the edges, and the frame is letterboxed or pillarboxed to fit the screen. A value of 100 “zooms in” to fill the screen, cropping content off the edges of the screen as needed to fit the picture to the screen. Values between 0 and 100 allow the user to choose intermediate stages between the two extremes according to preference. The intermediate stages allow the user to choose between letterboxing/pillarboxing and cropping to fill the screen.
Offline
This field, if set to “1,” instructs CASTUS not to start the item automatically. If scheduled to play, the schedule in CASTUS will skip over it and replace it with the default item. If part of a folder item, the folder item will ignore it. You can undo this state by setting the tag to 0 or removing the tag.
Order
This tag controls how media items are played in a folder, when the folder is scheduled. If not set, items are chosen by random. Valid values are random and lexicographical order.
Lexicographical order means that the media item will sort the list of files in memory alphanumerically (in order of 0 to 9, then A to Z, then a to z) then play them in that order. This tag is intended for use on folders, not metadata items themselves.
Out
This field is used to indicate where in the video that CASTUS should stop playing by default, in seconds. It is the “Out” point that playback stops instead of playing to the end of the file. It can be used to stop playback early in case of extra black space or colorbars at the end of the file.
Producer
This is a field intended to carry any free-form string describing the producer or producers of the show or file.
Program
This is a field intended to carry any free-form string carrying the name of the program. This field is used by the CASTUS VOD widget to group episodes of a program (all VOD items that have the same Program tag). When an item is selected on VOD, all episodes will be listed to the right of the video of the same program. This auto-graphing function is case sensitive so the program tag values must be identical.
Program Language
This tag carries an ISO 693-2 code describing the primary languages in the file.
Example values:
- “eng English”
- “fre French”
- “ger German”
Rating
This tag carries a code representing a rating for the program. This rating setting is carried with EPG data and is used by the CASTUS schedule item to automatically show the rating in the upper left-hand corner of the screen at the start of the program.
Example values:
- United States/TV-Y TV-Y (child-oriented, all ages)
- United States/TV-Y7 TV-Y7 (child-oriented, 7 or older)
- United States/TV-MA TV-MA (for adults, unsuitable for under 17)
Recommended Minimum Age
This tag is intended for use in countries that use the Digital Video Broadcasting standard. It is transmitted as part of the EPG data concerning the minimum age-appropriate to watch the show. Valid values at 4 to 18.
Schedule Announce
This tag controls whether the item appears in schedule listings for the channel. If not set, or empty, then the item will be listed unless scheduled as a default item. If set to 1, the item is always listed, and if set to 0, the item is never listed.
Search Tags
This is a free-form field intended to carry searchable tags, separated by spaces. This can be used to help certain shows appear by specific keywords on the CASTUS VOD system.
Season
This is a free-form field describing the season in whichever form the user chooses. Typical values may be “Season 1,” “Season 2,” or more creative text like “CASTUS Training.”
Sort Order
This tag carries a number (positive, 0, or negative) that controls where the item “ranks” relative to other items in the CASTUS VOD system. Items with a higher sort order number will appear before items with a lower sort order number.
Stretch to Fit
This tag, if set to 1, instructs the playback system to stretch (distort) the picture to fit the screen rather than the letterbox/pillarbox to fit.
Summary
This is a free-form field intended to carry a summary of the item. Detailed descriptions should be placed in the Description metadata tag. We recommend a max of 150 characters.
Title
This is a free-form field intended to carry the exact text that CASTUS and VOD should display for an item. If this field is not set, CASTUS will show Program - Episode instead.
Upload Time
This field holds the date and time the file was uploaded to CASTUS, in MM/DD/YYYY, HH:MM:SS [AM/PM] format.
CASTUS Support
Need additional help? Contact our support team at support@castus.tv or call the dedicated support line at 800.215.3880 between 9a - 5p (PT). You can also submit a Support ticket directly.
With a CASTUS C4 or C8 Support and Maintenance Plan, you’ll enjoy:
- Access to the CASTUS Knowledge Base,
- A dedicated support email address (support@castus.tv) that automatically generates a support ticket for you, instantly notifying our support team.
- Access to a live, certified CASTUS representative via phone 9a to 5p (PT) (800.215.3880).
- After-hours emergency support for C8 customers.
- "Tech Support Connect" connection for a technician to log in and troubleshoot.
- 2 (C4) or 4 (C8) scheduled training sessions (training@castus.tv) or refresher courses.
- 2 (C4) or 4 (C8) scheduled in-depth sessions (training@castus.tv) with a CASTUS technician.
- Software updates.
Email us anytime at billing@castus.tv to enroll or upgrade your support plan.