
CASTUS Cuts is a simple, non-linear video editor built into the CASTUS platform, allowing you to create layered video projects quickly and easily. You can trim clips, stack multiple videos, graphics, and text, and instantly save and play your project—no rendering or exporting required. CASTUS Cuts is commonly used for creating bulletin boards, slide shows, and layered content. Best of all, it's non-destructive—your original media files remain untouched.
NOTE: Audio preview is currently not supported in CASTUS Cuts.
Controls & Display
CASTUS Cuts Controls let you configure key project settings: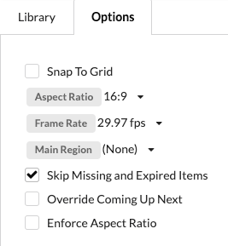
- Snap to Grid: Aligns visual elements to a predefined grid, making it easier to position, organize, and maintain consistency across your layout.
-
Aspect Ratio: Set the project’s aspect ratio; default is based on the selected channel.
-
Frame Rate: Choose the frame rate (recommended: 29.97 fps).
- Main Region: Define the main region of your project.
-
Skip Missing and Expired Items: Automatically skips inactive media tagged with expiration metadata; expired items show in red in the library.
-
Override Coming Up Next: Exclude the project from showing up in your "Coming Up Next" list.
-
Enforce Aspect Ratio: Locks the project’s aspect ratio, ignoring the channel’s default.
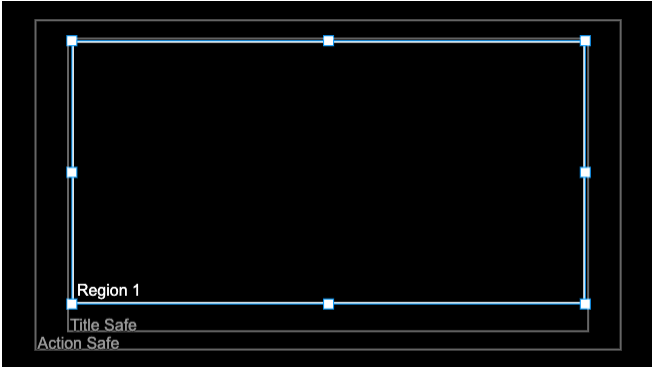
Canvas
The Canvas is the visual workspace in CASTUS Cuts where you position and scale multiple layered regions independently. It includes Title and Action Safe margins to help ensure your overlays appear correctly across various screen sizes.
Timeline
The Timeline in CASTUS Cuts is your control center for editing—allowing you to add, stack, trim, play, copy, paste, and manage content across multiple regions in your project.
Tools
Use a range of tools to move, trim, copy, and play your media items—and for quick adjustments, simply grab the tail of any clip to manually extend or shorten its duration right on the timeline.
.png?width=670&height=132&name=CCuts-Timeline%20Tools%20(1).png)
- Pointer Tool: Use for Click & Stick and moving items within the timeline.
- Razor Tool: Trim clips directly on the timeline.
- Snap Tool: Align clips precisely by snapping their in/out points together.
- Copy Tool: Duplicate selected items in your timeline.
- Paste Tool: Insert copied items into the timeline.
- Play Tool: Preview the timeline by playing its contents.
Regions
Regions are timeline tracks in your project—if you add multiple items in the same region, they'll appear in the same screen area. To add a new region, click + Add Frame or drop media into the white space next to that option.
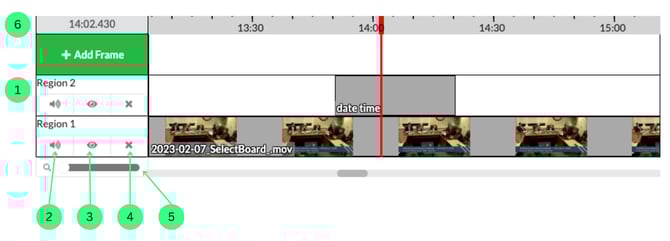
- Region Name: Rename individual regions (defaults are Region 1, Region 2, etc.).
- Mute: Mute audio for a specific region.
- Hide/Show Region: Toggle visibility of a single region.
- Delete Region: Permanently remove a region from your project.
- Zoom In & Out: Adjust your view of the timeline to either see the big picture or zoom in for precise editing and trimming.
- Precision Editing Tool: Enter a specific timecode to instantly jump to an exact point in your timeline—perfect for making quick, accurate edits.