
Creating Blocks
In the Schedule
- Navigate to where you want your block placed in the schedule.
- Click the action dropdown to the left of the time.
- Choose Create Schedule Block.
- Name the block and press Submit.
- Enter how long you would like the block to run. The duration format is HOURS:MINUTES:SECONDS. Choose Submit.
- The new empty block will now appear in the schedule.
In the Blocks Widget
- Select the Blocks tab next to the Library tab on the right hand side of the screen.
- Choose the green New Block button. This button appears at the bottom if there are existing blocks already in the schedule.
- Name the block and press Submit.
- Enter how long you would like the block to run. The duration format is HOURS:MINUTES:SECONDS. Choose Submit.
- Begin by selecting the desired start time for the show, followed by choosing the corresponding date or day, based on the type of schedule you are using. This selection will be added to the list on the right. You can repeat this process for any additional days and times you wish to include.
- Choose Submit to take these changes.
- The new empty blocks will now appear in the schedule.

Adding Content
- After creating a blank block in the schedule, utilize the Library widget located on the right side of the screen to browse and select the content you wish to incorporate.
- You can select either a single entry or multiple entries, keeping in mind that the sequence of selection is important.
- Position your cursor within the block at the specific time where you would like your content to begin and click to stick your content.
Replicating Content
- After adding content to a single block, you can easily duplicate it across your entire schedule by clicking the replicate button on that block.
- Alternatively, you can select the action dropdown to replicate the block either backward or forward, allowing you to customize the replication process to specific blocks in your schedule rather than applying it to all blocks at once.
Adjusting Block Length
- If the contents of the block exceed the block length, you will see an error with the option to Expand Schedule. Choose this to lengthen the block.
- If the contents of the block are shorter than the block length, you can use the Fit Block to Contents option to shorten the block length.
- Any space in the block that is not filled with programming will play your schedule default.
Duplicating Blocks
In the Schedule
- Click the checkbox located in the header of the block, which displays the time, duration, and block name, to select the desired block.
- Use the action dropdown to copy.
- Click & Stick into your schedule.
In the Blocks Widget
- Open the Blocks widget on the right hand side and click the selection box to the left of the block details.
- Click & Stick into your schedule.
Block Widget
The Blocks Widget is located on the right side of the screen next to the Library Widget tab.
Customize Blocks
- The name of your block can be changed in this window. It will apply to all of the same block throughout your schedule.
- The color can be changed in this window as well. Choose the color to bring up a color picker. This helps easily and visually identify different blocks in your schedule.
Schedule Announce
The schedule announce dropdown allows you to customize how your block is presented to your customers on your Video on Demand website. This does not currently apply to the Coming Up Next feature on-screen within CASTUS.
Default: If the block is empty, show the block name. If the block has item(s) in it, show the item name(s).
Block: Always show the block name.
Items: Always show the names of the items within the block.
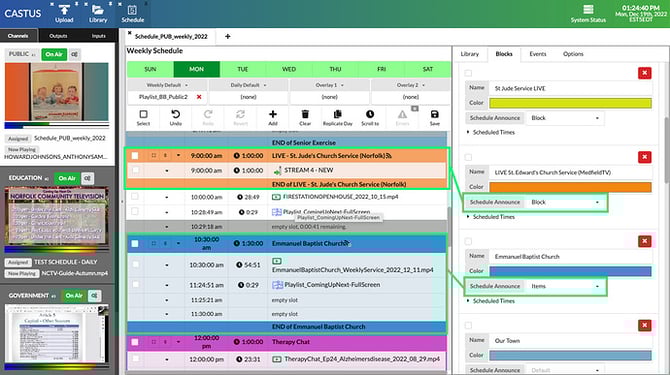
Scheduled Times
- Select the arrow next to Scheduled Times to see each time the block is in your schedule.
- Select the day/date and time to go directly to that point in your schedule.