
BACK UP OPTIONS
Full Backup
A full backup will preserve all of your content, settings, projects, and schedules. Back up everything in /mnt/main/ EXCEPT for /mnt/main/tv/ In /mnt/main/tv/ back up only the following folders:
- fonts (/mnt/main/tv/fonts)
- inputs (/mnt/main/tv/inputs)
- outputs (/mnt/main/tv/outputs)
- remdermgr (/mnt/main/tv/rendermgr)
- routing (/mnt/main/tv/routing)
- schedule-filters (/mnt/main/tv/schedule-filters)
- timer.recording.list (/mnt/main/tv/timer.recording.list)
Partial Backup
A partial backup will not back up your content, but will back up your settings, templates, and schedules. This is a much smaller backup and does not require as much space.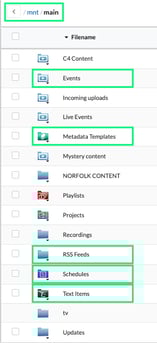
- Back up the following folders in /mnt/main/:
- Events (/mnt/main/Events/)
- Metadata Templates (/mnt/main/Metadata Templates/)
- RSS Feeds (/mnt/main/RSS Feeds/)
- Schedules (/mnt/main/Schedules/)
- Text Items (/mnt/main/Text Items/)
- Watch Folders (/mnt/main/Watch Folders/)
- In /mnt/main/tv/ back up only the following folders:
- fonts (/mnt/main/tv/fonts)
- inputs (/mnt/main/tv/inputs)
- outputs (/mnt/main/tv/outputs)
- remdermgr (/mnt/main/tv/rendermgr)
- routing (/mnt/main/tv/routing)
- schedule-filters (/mnt/main/tv/schedule-filters)
- timer.recording.list (/mnt/main/tv/timer.recording.list)
- Optionally, you can back up the following folders as well but they are potentially much larger than the previous folders and contain video content.
- Incoming uploads (/mnt/main/Incoming uploads/)
- Playlists (/mnt/main/Playlists/)
- Recordings (/mnt/main/Recordings/)
HOW TO BACK UP
Check Drive Size Needs
- In the Version 5 software (V5), select System Status on the top right.
- The second to last item in the popup shows Disk Space. See how much space you are currently using in order to know what size drive you’ll need for a full backup.
-png-Mar-06-2025-08-21-08-2924-PM.png?width=427&height=247&name=unnamed%20(1)-png-Mar-06-2025-08-21-08-2924-PM.png)
- In the Version 4 software (V4), the yellow text at the bottom of your main login screen will display the same information as above. Find Disk Space to view your space needs.
-png-Mar-06-2025-08-21-46-3081-PM.png?width=358&height=117&name=unnamed%20(2)-png-Mar-06-2025-08-21-46-3081-PM.png)
File Transfer Protocol (FTP) - Recommended
This example will use Filezilla but any FTP program should work. If FTP hasn’t been used with your CASTUS yet, confirm your network router has port 22 or ports 20 and 21 open for FTP access. Additionally, confirm your CASTUS unit has FTP access enabled by going to CASTUS > System Services and confirm FTP access is running.
- Open Filezilla application on your workstation computer (not the CASTUS).
- Enter the following information to quickconnect:
- Host: IP Address of the CASTUS
- Username: root
- Password: Your root password
- Port: can leave empty
- Select the green Quickconnect button.
-png-Mar-06-2025-08-23-02-8535-PM.png?width=670&height=86&name=unnamed%20(3)-png-Mar-06-2025-08-23-02-8535-PM.png)
- Once connected, your local computer appears on the left and your CASTUS on the right.
- To navigate to your main folder on the CASTUS, in the lower right quadrant of your Filezilla screen, double click on .. > mnt > main.
-png-1.png?width=570&height=80&name=unnamed%20(4)-png-1.png)
-png-1.png?width=568&height=278&name=unnamed%20(5)-png-1.png)
-png-1.png?width=570&height=104&name=unnamed%20(6)-png-1.png)
Mounted Hard Drive or Flash Drive
Depending on the type and formatting of the drive, you may need to copy files individually instead of in bulk. FTP above is recommended for that reason, but this method can also be used.
- Plug your flash drive or hard drive into the USB slot in the front of the CASTUS unit.
- From any instance of the CASTUS user interface (it does not have to be the physical unit) navigate to CASTUS Main Menu > Library and click on “mnt” to open the mount folder.
-png-1.png?width=293&height=127&name=unnamed%20(7)-png-1.png)
- You should now see the name of your hard drive. Select the action dropdown to the left of the name and choose “mount.”
- Double click Data to get back to mnt/main and navigate to the content you want to back up (see above) in your CASTUS Library.
- Select the checkbox to the left of the folder(s) or item(s) you want to back up and select Copy at the top of the Library window. As noted above, based on drive type and format, you may or may not be able to copy a folder with it’s contents. Consider FTP if you run into issues.
- Navigate back to the /mnt folder and double click on your drive and open the folder you want to paste into. Choose “paste” at the top of the page. Repeat this process to copy additional folders and files.
- When you are finished with your external hard drive, it is VERY important that you properly unmount the drive before removing it from your CASTUS unit.
- To do so, navigate to CASTUS Main Menu > Library and click on “mnt” to open the mount folder.
-png-1.png?width=234&height=108&name=unnamed%20(8)-png-1.png)
- Select the action dropdown to the left of the hard drive name and choose “unmount.” You are now ready to remove your external drive!